
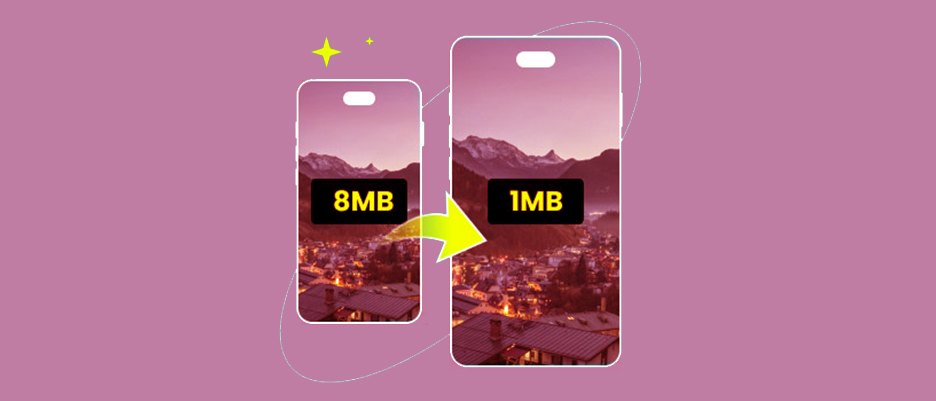
TL;DR: JPEG images can be compressed using built-in tools on Windows and Mac or online compressors to reduce file size without noticeably affecting quality. Understanding the difference between lossy and lossless compression helps you choose the right method. Compressed JPEGs improve website speed, SEO, and mobile usability and save storage space.
Compressing JPEG images is an essential step for optimizing visual content for web use, and when working with JPEG files, it’s especially important. Large JPG files can slow down page load speeds, generate higher bandwidth usage, and affect storage.
In this post, we’ll walk through how to compress JPEG images across Windows, Mac, and mobile devices, while preserving quality, and everything you need to know about JPEG or JPG image compression for optimal web performance.
What is a JPEG Image File?
JPEG stands for the short form of the Joint Photographic Experts Group. It’s one of the most common and standardized image formats that uses a compression method, balancing image quality and file size efficiently, making it ideal for photographs and other complex images.
Files typically use the .jpg or .jpeg extension, and they are widely supported across cameras, smartphones, and the web.
Advantages of JPEG Images:
- Offers high compression efficiency, reducing file size while maintaining acceptable quality.
- JPEG provides universal compatibility across operating systems, software, and web platforms.
- It’s an excellent format for photographs due to its strong color and gradient handling.
- JPG provides faster loading and easier sharing, thanks to smaller image sizes.
- It has adjustable compression levels that let you choose between quality and file size.
Lossy vs. Lossless: How JPEG Compression Actually Works?
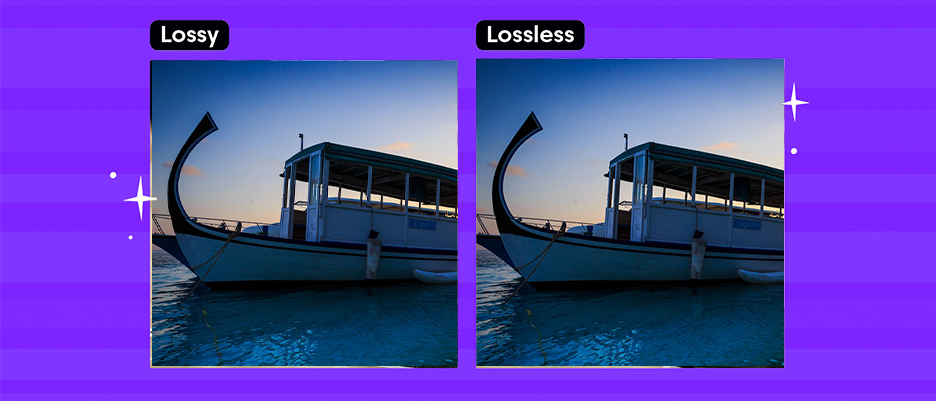
To effectively compress JPG images, it helps to understand how JPEG compression works. There are two broad types of image compression:
- Lossy compression permanently removes some image data to shrink the file size. The JPG format is most commonly associated with lossy compression. It provides a smaller file size but might result in a quality loss.
- Lossless compression preserves all the original data, reducing size only by eliminating metadata or inefficiencies. This compression doesn’t cause loss in quality, and the original file can be regenerated exactly from the compressed one.
With lossy JPEG compression, you can choose a trade-off between quality and file size. A higher compression ratio reduces more data but may introduce visible artifacts. A lower ratio preserves quality but reduces file size less.
In contrast, lossless JPEG (a less common mode) uses predictive coding to retain all the original information.
Recommended JPEG Compression Settings Guide
While these compression suggestions work well in most cases, they aren’t fixed for every image. The perfect level still depends on factors like sharpness, texture, and overall image quality.
| Use Case | Recommended Quality | Result |
|---|---|---|
| Blog & website images | 60 – 75% | Sharp, small files |
| Hero banners | 65 – 80% | High detail |
| Product photos | 75 – 85% | Clean & crisp |
| Printing | 90 – 100% | Maximum detail |
How to Compress JPEG Images on Windows?
Microsoft Paint is a quick built-in tool for reducing JPG size. Here are the steps to compress JPEG images on Windows using different methods:
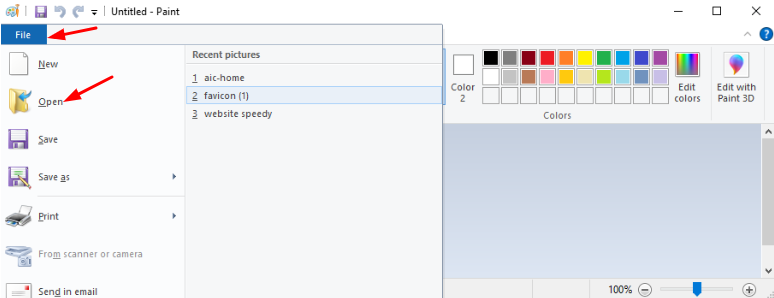
Method 1: Using Microsoft Paint
One of the simplest ways to compress JPG images on Windows is through the built-in Microsoft Paint app. It provides excellent compression and resizing features. Here’s how:
1. Open Paint (you can search “Paint” in the Start menu).
2. Click File → Open, and select the JPEG image you want to compress.
3. Use the Resize tool (in the Home tab) to reduce dimensions by percentage or pixel count. Keep “Maintain aspect ratio” checked to avoid distortion.
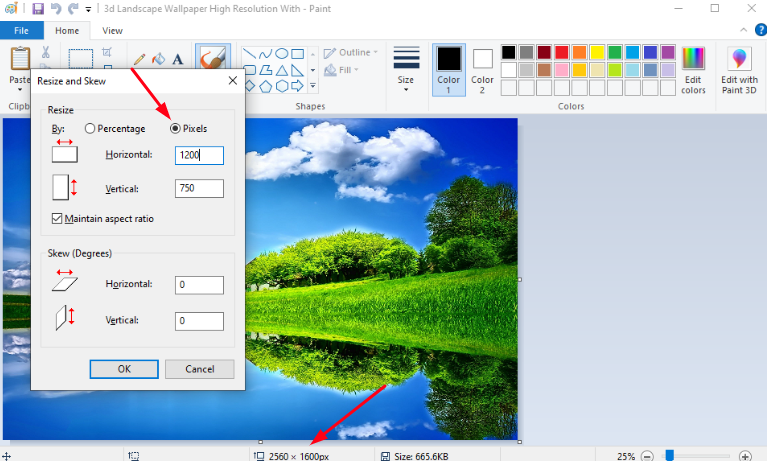
4. Optionally, you can crop the image using the Select tool to remove unnecessary parts.
5. After resizing or cropping, go to File → Save As → JPEG Picture, and save the new version.
6. Check the file size of the saved image; it’s likely much smaller than the original, because reducing dimensions helps reduce JPEG file size without severely degrading quality.
This method essentially relies on reducing resolution, which is a form of compression by decreasing data, though it doesn’t explicitly control the JPG compression ratio.
Method 2: Using the Windows Photos App
Another way to compress JPEG without losing quality (or with minimal quality loss) on Windows is using the built-in Photos app (in Windows 10/11):
1. Open the Photos app and load the JPEG image.
2. Click on the three-dot menu (or “…”) and choose Resize.
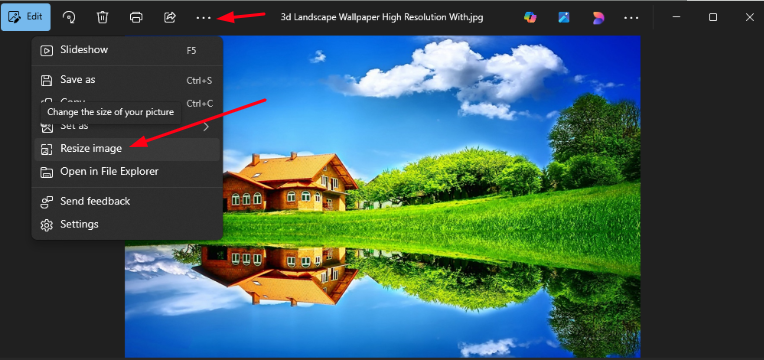
3. Pick a preset (e.g., “Small,” “Medium,” “Large”) or specify custom dimensions.
4. Save the resized copy, often as a new file, so your original is preserved.
Although Resize in Photos doesn’t provide a “quality slider” for JPG like dedicated editors, reducing resolution effectively reduces photo size on Windows, thereby reducing the file size.
How to Compress JPEG Images on Mac
You can use these two methods to compress JPEG images on a Mac. Using the preview method gives you precise quality control, while the second method is perfect for batch compression.
Method 1: Using Preview (Quality Slider)
On a Mac, the Preview application is handy for JPG image compression:
1. Open the JPEG in Preview by double-clicking on it.
2. Go to File → Export.
3. In the export dialog, you will see a Quality slider; drag it left to decrease quality (and file size), or right to preserve more detail.
4. Choose where to save, and give the compressed file a new name to preserve the original.
By adjusting the quality slider, you can compress large JPEG files to a smaller size. This method allows a good balance between compression and image fidelity, so you can optimize photos for web performance by preserving visual appeal while reducing data.
Method 2: Using Mac “Convert Image” Quick Action
Another way on macOS is to use the Convert Image Quick Action (available via Finder):
1. In Finder, select one or more JPEG files.
2. Right-click and choose Quick Actions → Convert Image.
3. In the dialog, choose JPEG as the format, then pick a size (Small, Medium, Large) and set the quality.
4. Click Convert, and the new, compressed versions will appear.
This approach is convenient when you want to compress multiple JPEG images at once on a Mac without opening Preview individually. The quality setting ensures you can compress without losing too much detail, depending on your needs.
How to Compress JPEG Images on Mobile (iPhone & Android)
Mobile devices make JPEG compression extremely easy, especially if you want quick results without using a computer. Whether you’re sending photos, saving storage, or optimizing images for social media or websites, these apps help you shrink JPG files in seconds.
Best iPhone Apps for Compressing JPEG Images
1. Compress Photos & Pictures (iOS)
Compress Photos & Pictures is one of the most widely used JPG compression apps for iPhones because of its simplicity and accuracy. It focuses on giving you full control over both resolution and quality, allowing you to drastically shrink file sizes while keeping the image visually appealing.
Key Features:
- Adjust both image quality and image dimensions
- Compress multiple photos at once
- Real-time preview of estimated file size reduction
- Keeps original photos safe unless you delete them
Why It’s Good:
This app is ideal for beginners, casual users, and business owners who need quick JPEG compression without navigating complicated menus. It’s efficient, fast, and reliable for everyday use.
2. Image Size (iOS)
Image Size lets you take a more technical approach by resizing and compressing photos with exact measurements. This is especially useful when you need specific image dimensions, such as for blogs, print layouts, product listings, ID photos, or professional documents.
Key Features:
- Resize images by entering exact pixels, cm, mm, or inches
- Allows fine-tuning resolution for web, documents, or printing
- Automatic aspect ratio lock to avoid distortion
- Simple interface with quick export
Why It’s Good:
This app is perfect for content creators, marketers, or anyone uploading JPEGs to platforms with strict size requirements (e.g., Amazon, Etsy, Shopify, bidding portals). It gives you accuracy and consistency.
Best Android Apps for Compressing JPEG Images
1. Photo & Picture Resizer (Android)
This app is considered one of the most dependable JPEG resizing tools on Android. Its preset sizes and fast compression engine make it perfect for reducing large camera photos without compromising quality.
Key Features:
- Resize by presets (25%, 50%, 75%) or custom pixels
- Batch compression and renaming
- Maintains original aspect ratio
- Very fast processing, even for large photos
Why It’s Good:
Ideal for users who frequently shoot high-resolution images on Android devices and need to shrink them quickly, especially bloggers, sellers, and photographers.
3. Lit Photo Compress & Resize (Android)
Lit Photo is a highly user-friendly, fast-performing app built for everyday compression tasks. Its combination of compression, cropping, and resizing makes it versatile for multiple use cases.
Key Features:
- Compress, resize, and crop images
- Batch processing for multiple JPGs
- Maintains strong visual quality even at high compression
- Supports quick sharing to apps after compression
Why It’s Good:
It’s an ideal choice for social media creators, online sellers, and small business owners who regularly upload product photos, marketing visuals, or blog images from their phone.
Steps to Compress JPEGs on Mobile
Although every app has its own interface, the basic process remains the same:
Step 1: Open your chosen app
Launch the compression or resizing app from the App Store or Google Play.
Step 2: Import your JPEG image(s)
You can select one or multiple photos from:
- Camera Roll (iPhone)
- Gallery (Android)
- Files app (if stored elsewhere)
Step 3: Choose your compression settings
Depending on the app, you may be able to adjust:
- Image quality (%)
- Image dimensions (pixels)
- Metadata removal
- Noise reduction (Android-only)
Use:
- 60 – 75% quality for websites
- 70 – 85% for good quality sharing
- Lossless settings for prints or professional usage
Step 4: Preview (optional but recommended)
Most apps allow previewing the output so you can avoid overcompressing.
Step 5: Export the compressed files
Save the compressed JPEGs:
- Back to your phone
- Directly to WhatsApp, email, Instagram, or cloud storage
- Or into a new folder inside the app
Apps usually keep originals untouched unless you choose to replace them.
How to Compress JPEG Images Online?
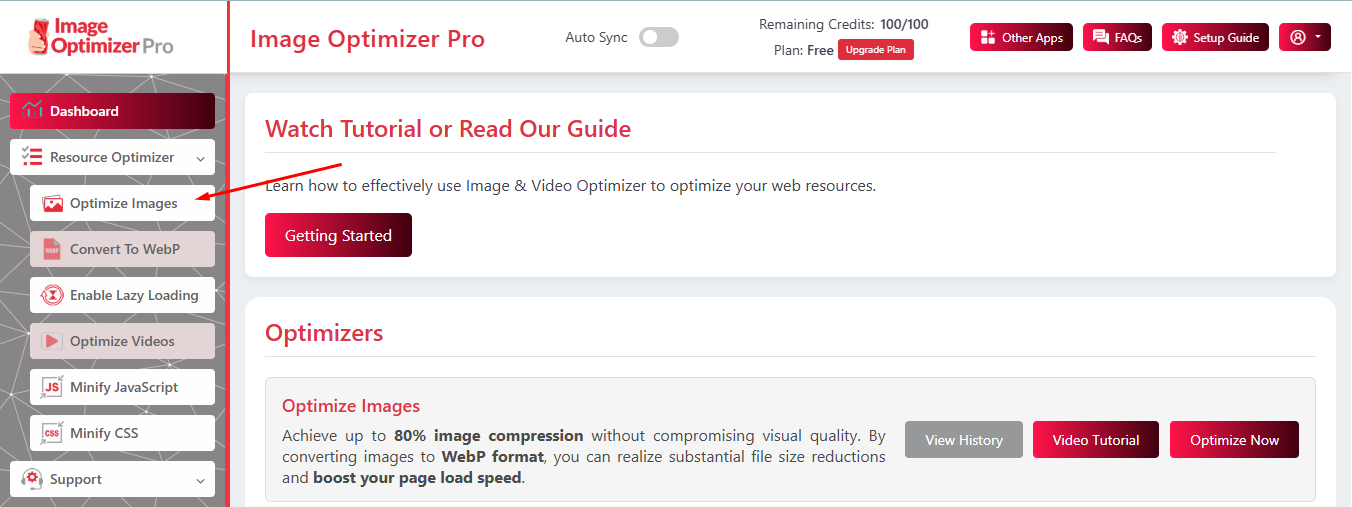
If you prefer not to rely on desktop apps or want to compress easily, online compression tools like Image Optimizer Pro are more convenient. Using this tool can provide you with compression without losing quality, maintaining clarity and detail.
Image Optimizer Pro stands out in compression tools as it analyzes the quality of your image and then decides the best compression rate accordingly, preventing your image from degrading. This will let you compress JPEGs without losing quality visibly (especially at moderate compression levels), making them ideal for optimal web performance.
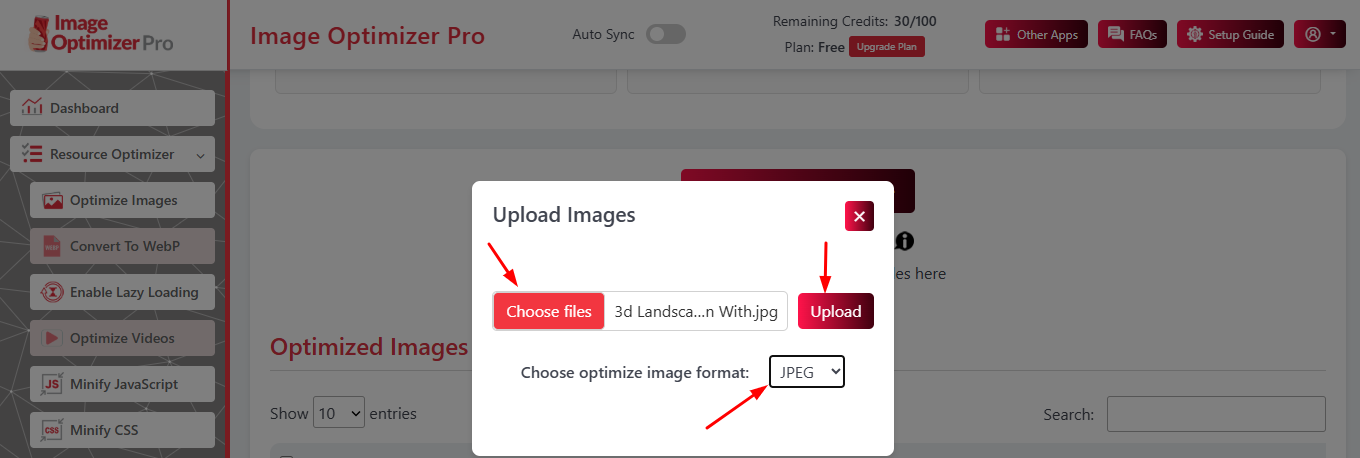
Steps to Compress JPEGs Online
Image Optimizer Pro works on a simple drag-and-drop method. Here are the steps to use it for compressing images:
Step 1: Go to the Image Optimizer Pro tool and select Optimize Images.
Step 2: Choose your file to compress, select Format to JPEG, and upload.
Step 3: Click on the download button and save the compressed images.
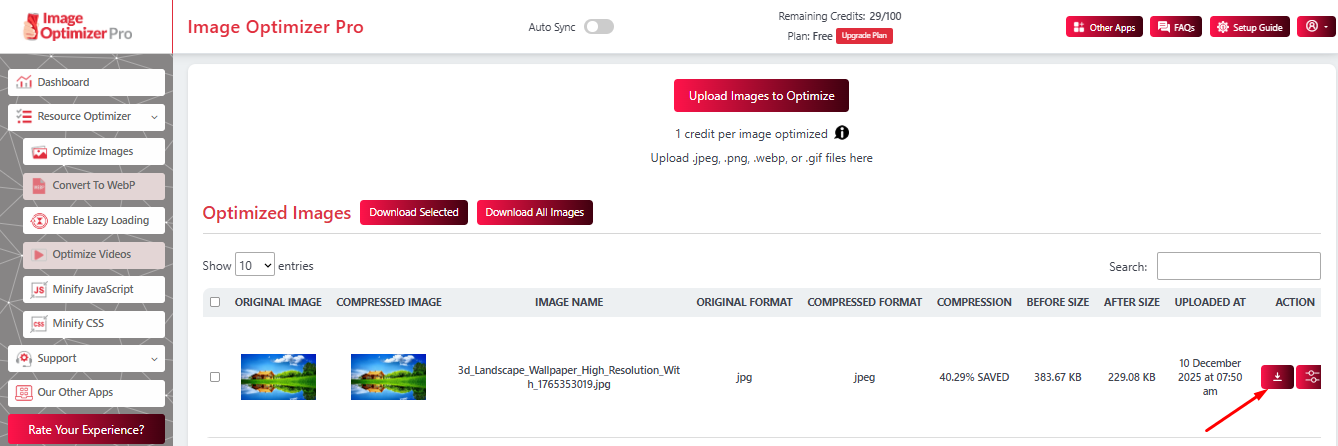
With Image Optimizer Pro, compressing your images becomes effortless. In just three simple steps, anyone can optimize images without technical skills, saving time while boosting site performance.
JPEG vs PNG vs WebP: Which Format Should You Use?
| Format | Best For | Pros | Cons |
|---|---|---|---|
| JPEG | Photos | Small size, great colors | Lossy |
| PNG | Graphics, logos | Sharp edges, transparency | Larger size |
| WebP | Modern web use | Smallest size, high quality | Older browsers may need a fallback |
Benefits of Compressing JPEG Images
Compressing JPEG images provides benefits such as faster loading times, free storage space, improved performance, and more. Here are the key benefits:
1. Reduced File Size and Bandwidth:
Smaller JPGs reduce data transfer needs, speeding up loading times and lowering bandwidth usage. This is especially helpful for websites with high traffic or users browsing on limited data plans.
2. Faster Website Performance:
Optimized, lightweight images help web pages render quickly, improving overall site speed. Faster-loading visuals also reduce bounce rates and create a smoother browsing experience.
3. Improved SEO:
Search engines prioritize fast-loading websites, so compressed images can support better rankings. Faster visual delivery also enhances Core Web Vitals, which directly influence SEO performance.
4. Storage Savings:
Reducing JPEG file size helps save valuable storage space on Windows, Mac, and mobile devices. This allows you to store more images, documents, or applications without constantly clearing space.
5. Better Usability on Mobile:
Compressed images load quickly on mobile networks, even in areas with slow connectivity. They also use less data, improving user experience and keeping mobile visitors engaged longer.
Conclusion
Compressing JPEG images is a vital practice for anyone working with digital media, whether you’re a content creator, web developer, or simply managing photo storage. By understanding JPG image compression (especially the difference between lossy vs lossless), and using the tools available on Windows (Paint, Photos), Mac (Preview, Convert), or online, you can reduce JPEG file size significantly without unacceptable quality loss. The right compression helps you optimize photos for web performance, keep storage lean, and deliver a better experience for your audience.
FAQs
1: How do I compress the size of a JPEG without losing quality?
2: Can you compress JPEG images while keeping high resolution?
3: Should I use lossy or lossless compression for website images?
4: How much can a JPEG be compressed?
5: Does compressing a JPEG affect its clarity or sharpness?
11 December, 2025
Leave a CommentIshan Makkar
He is a web performance specialist with hands-on experience optimizing websites for speed, media efficiency, and user engagement. As the founder of Website Speedy and Image Optimizer Pro, he has helped businesses across multiple industries improve load times, strengthen SEO, and reduce bounce rates. His work focuses on creating reliable, data-driven optimization solutions that deliver measurable results and build long-term digital trust.